
It seems like all you see in your Instagram feed is Reels. That’s right! Because Instagram prioritizes Reels and automatically creates Reels from every uploaded video of less than 90 seconds.
So it’s a great time to get into it!
What are Reels?
Reels are engaging short videos on Instagram and Facebook that last up to 90 seconds. The videos consist of one continuous short or a series of mini-clips.
There are also many possibilities to editing them. This means you can add music, audio tracks from other videos, AR effects, and much more.
Important tips in advance
As an entrepreneur, you want to be visible in the right places as much as possible. Reels are perfect for this purpose. To get as much interaction with your Reel as possible, it is wise to keep an eye on the following 3 things:
- Make sure you grab the viewer’s attention in the first few seconds. If something doesn’t grab and captivate in the first few seconds, the viewer will continue scrolling.
- Provide real added value for your target audience. Share something that sticks and gives new insights.
- Join the trends. Is a certain song very popular? Or is a certain sound being used often? See if you can include this in your Reels since it has a positive effect on your algorithm.
6 STEPS TO MAKING A REEL
1. Get inspired
I can imagine that, at first, you have no idea how to use Reels for your business. If you’re having trouble finding ideas for creating videos, try to get inspired by the Reels ‘explore’ page. You’ll find this page when tapping on the third icon at the bottom of your screen.
Start thinking about what content you want to include in the videos. Will you choose to share practical tips? Will you give a short tutorial, or will you go for a before-and-after video?
Write down some ideas on paper and go from there. Make sure the videos always add value and are entertaining for your target audience.
2. Create a concept
Instagram Reels really help you to grow your audience and increase your reach. The algorithm works differently for Reels than for the regular posts and Stories. Take advantage of this and start creating Reels today to significantly increase your visibility and brand awareness on Instagram.
Before you actually start filming, make sure you have a plan written down about the contents of the video. If you are just starting to make videos, try to make a few test shots first. This will help you get a bit more of a feel for it and make it easier and more fun.
3. Open the Reels functionality
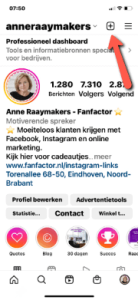
Open the Reels functionality on Instagram. To do so, open the Instagram app and go to your Instagram account. In the top right corner, there is a square with a plus sign. Click on this icon.
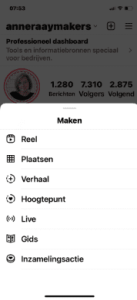
You will get to the screen for creating a new post. On the bottom of your screen you can see a small bar with options. Choose ‘Reel’.
This is the screen where you can start recording your Reel. Pressing the button in the bottom center will start the video recording immediately and you can start recording.
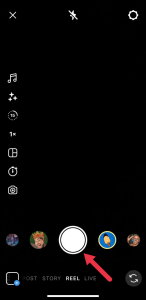
Only record what you want to show in your Reel. Know that you have a maximum of 60 seconds and you need to grab the attention in the first few seconds.
4. Recording a Reel
This is the step where we are going to start recording the Reel. Know that it is possible to record in several places or to record several fragments. Each clip is automatically saved. If you want to continue, press the record button in the middle of your screen again.
On the left you will see 7 different icons. The fifth icon is important: the stopwatch icon.

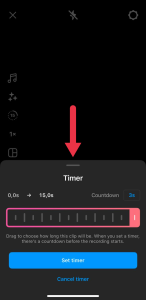
When you click on this, an option will appear where you can set a timer. This helps you to automatically start and stop your recording without using the record button.
After that, the recording starts automatically. By the way, when making a Reel, it is very useful to use a tripod.
I’ll explain more about the other options within Reels.
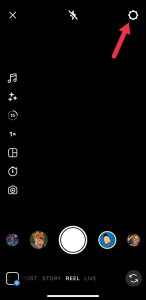
To settings
At the top right of your screen, there is a cog-wheel icon that takes you to an overview with all kinds of settings that you can adjust.
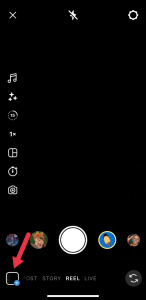
To your gallery
At the bottom left, you can access the videos in your gallery by clicking on the square.
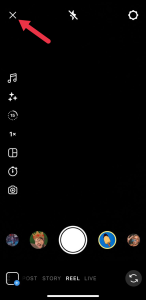
Leaving the screen
Click the x in the upper right corner to exit the camera view and return to your Instagram feed.
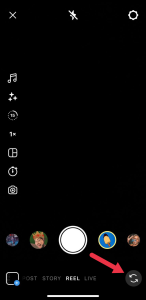
Choosing a camera
At the bottom right of your screen, you can choose which camera you want to use (front or back).
Features
In addition, you have several features on the left side.
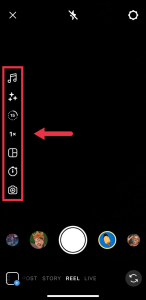
From top to bottom:
Audio: here you can access the music database and choose a suitable audio file for your Reel.
Effects: here you can choose an AR effect or filter for you Reel. Try some effects to make your video even more attractive.
Length: Here you can set the length of your video. You can choose between 15 seconds, 30 seconds, 60 seconds, and 90 seconds.
Speed: Here you can speed up or slow down your video. You can choose from different speeds and create cool effects.
Layout: here you can choose your desired layout.
Timer: the timer helps you to start and stop your recording automatically without using the record button.
Dual: here you can enable both your front and back cameras for recording at the same time.
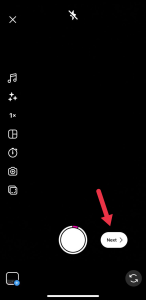
Once you have recorded a video, use the ‘Next’ button at the bottom right to go to the next step.
5. Editing a Reel
You have now created a video. After you have recorded separate clips, you can still edit and shorten them to make a smooth video.
To do this, click on ‘Edit Clips’ in the lower left corner.
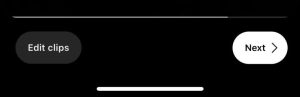
You can also add other clips here.
Ninja tip: did you know you can add photos and show them in Reels? To do this, click on the square in the lower left corner that leads you to your gallery. Here, choose a desired photo which you want to put in the Reel.
Then do the same with more images. To make these images into a Reel, place all the images in the ‘Edit clips’ feature.
Now you can further edit your Reel. At the top of your screen you will find several options.
![]()
You probably recognize many of these symbols from Instagram Stoires. For example, on the right side of the search bar you can see “Aa”. This allows you to add text. The music icon enables you to add music to your video.
You can also use the sticker feature to insert stickers or GIFs. Or add effects. Try the different options and see what suits you and your business.
Ninja tip: If you want to edit your Reels more, you can use an online tool like Canva
The pro version of Canva has a special Reels feature that allows you to quickly and professionally edit, cut, customize, and shape your videos with stickers, GIFs, and filters. It’s great!
Ready? Then click the ‘Next’ button at the bottom. This will take you to the last screen where you can enter the last details.
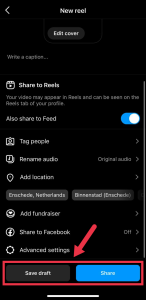
6. Share a Reel
Once you have created a video, you can share it in 2 ways: as a Reel or as a Story. I recommend you choose the Reel option because it has a wider range.
To do this, click on the image of your created Reel. At the top, if necessary, adjust the image that should appear in your feed. Now you can also add caption.
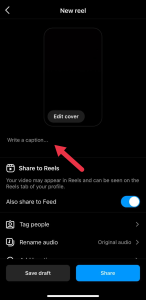
When writing a caption, don’t forget about adding hashtags. They play an important role in Reels. Choose 5-7 hashtags that fit the content of the video, as well as your business.
Next, there are some settings you can adjust.
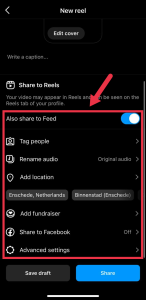
See what else you want to do here. Ready? Then you can save your draft using the ‘Save draft’ button at the bottom. Or you can share your Reel by tapping the ‘Share’ button. The Reel will be live immediately.
Of course, you can also share the video as a regular post and as a story on your Instagram.
Want to know more about how to use Reels as an entrepreneur? Then also read this blog: https://www.365daysofsuccess.com/22-content-ideas-for-appealing-instagram-reels/
Good luck, and have fun creating Reels!
